We’ve all heard stories about people having bad experiences when applying for visas at certain embassies or consulates. In our case of applying for visas for Russia, Mongolia and China for our Trans-Mongolian railway adventure, we were impressed by how painless it actually was when we did some reading beforehand. These are my experiences with applying for visas in Oslo. Continue reading “Obtaining visas for our Trans-Mongolian railway trip – a painless experience!”
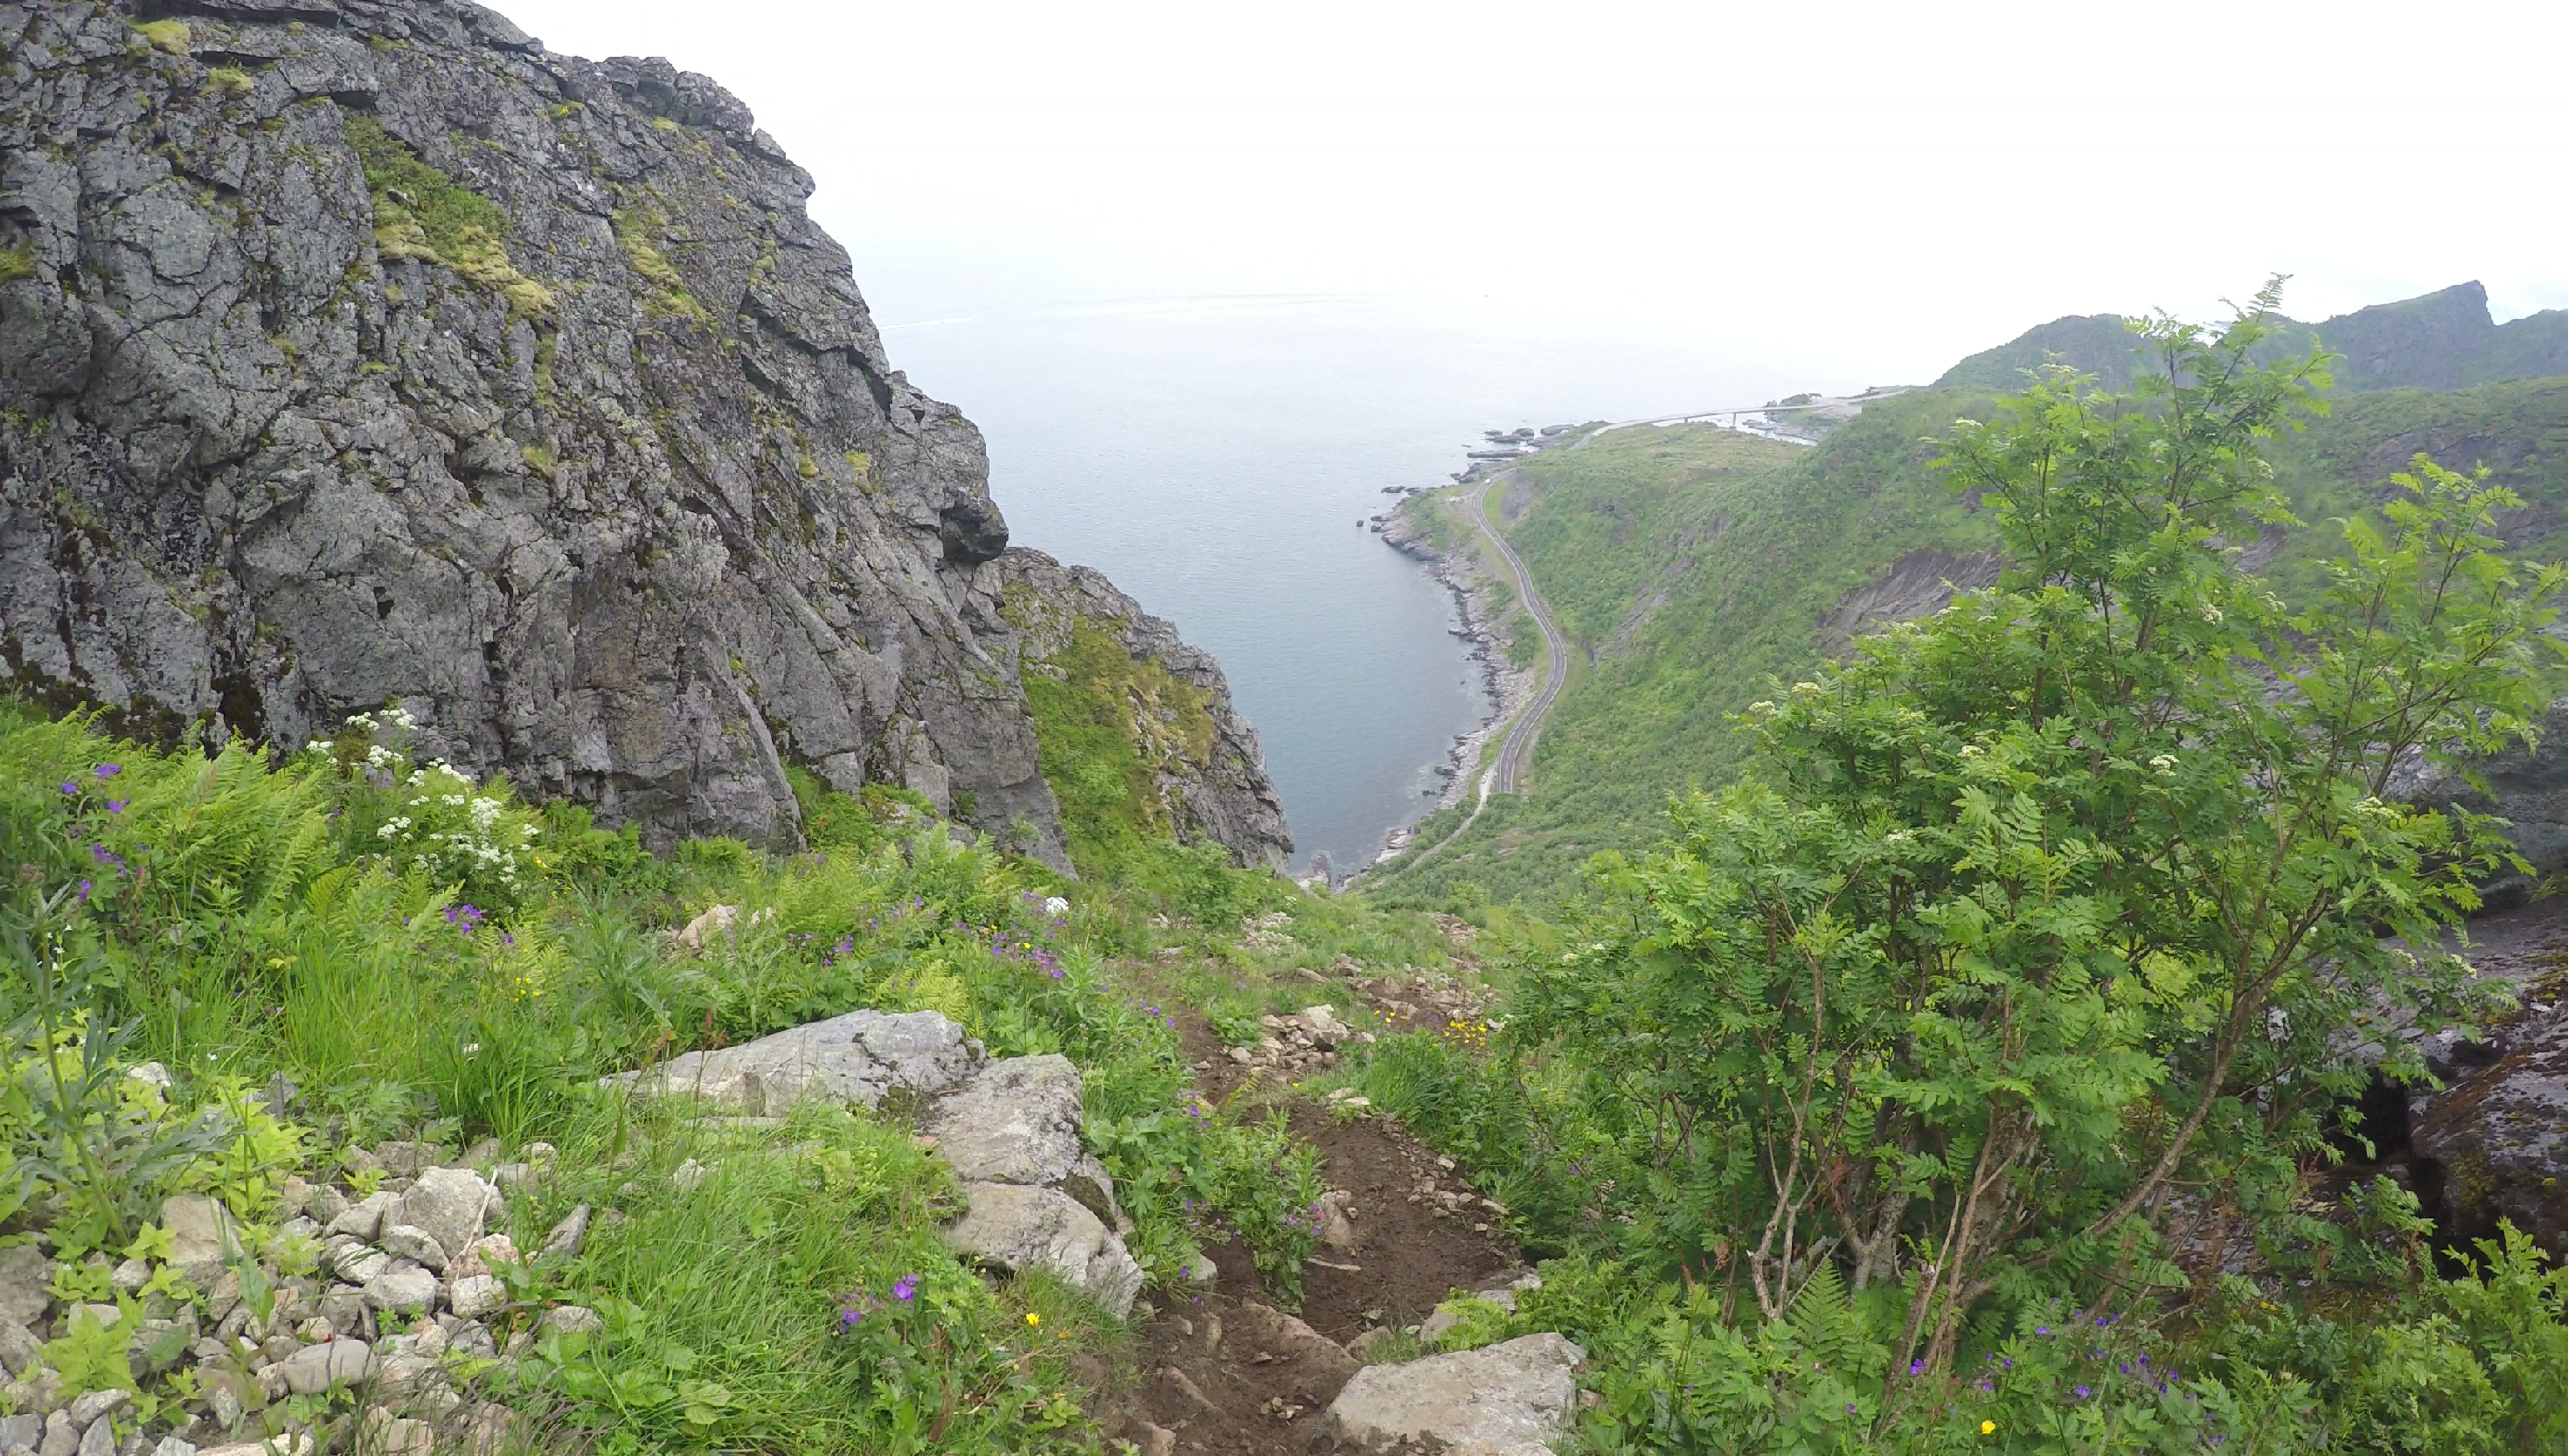
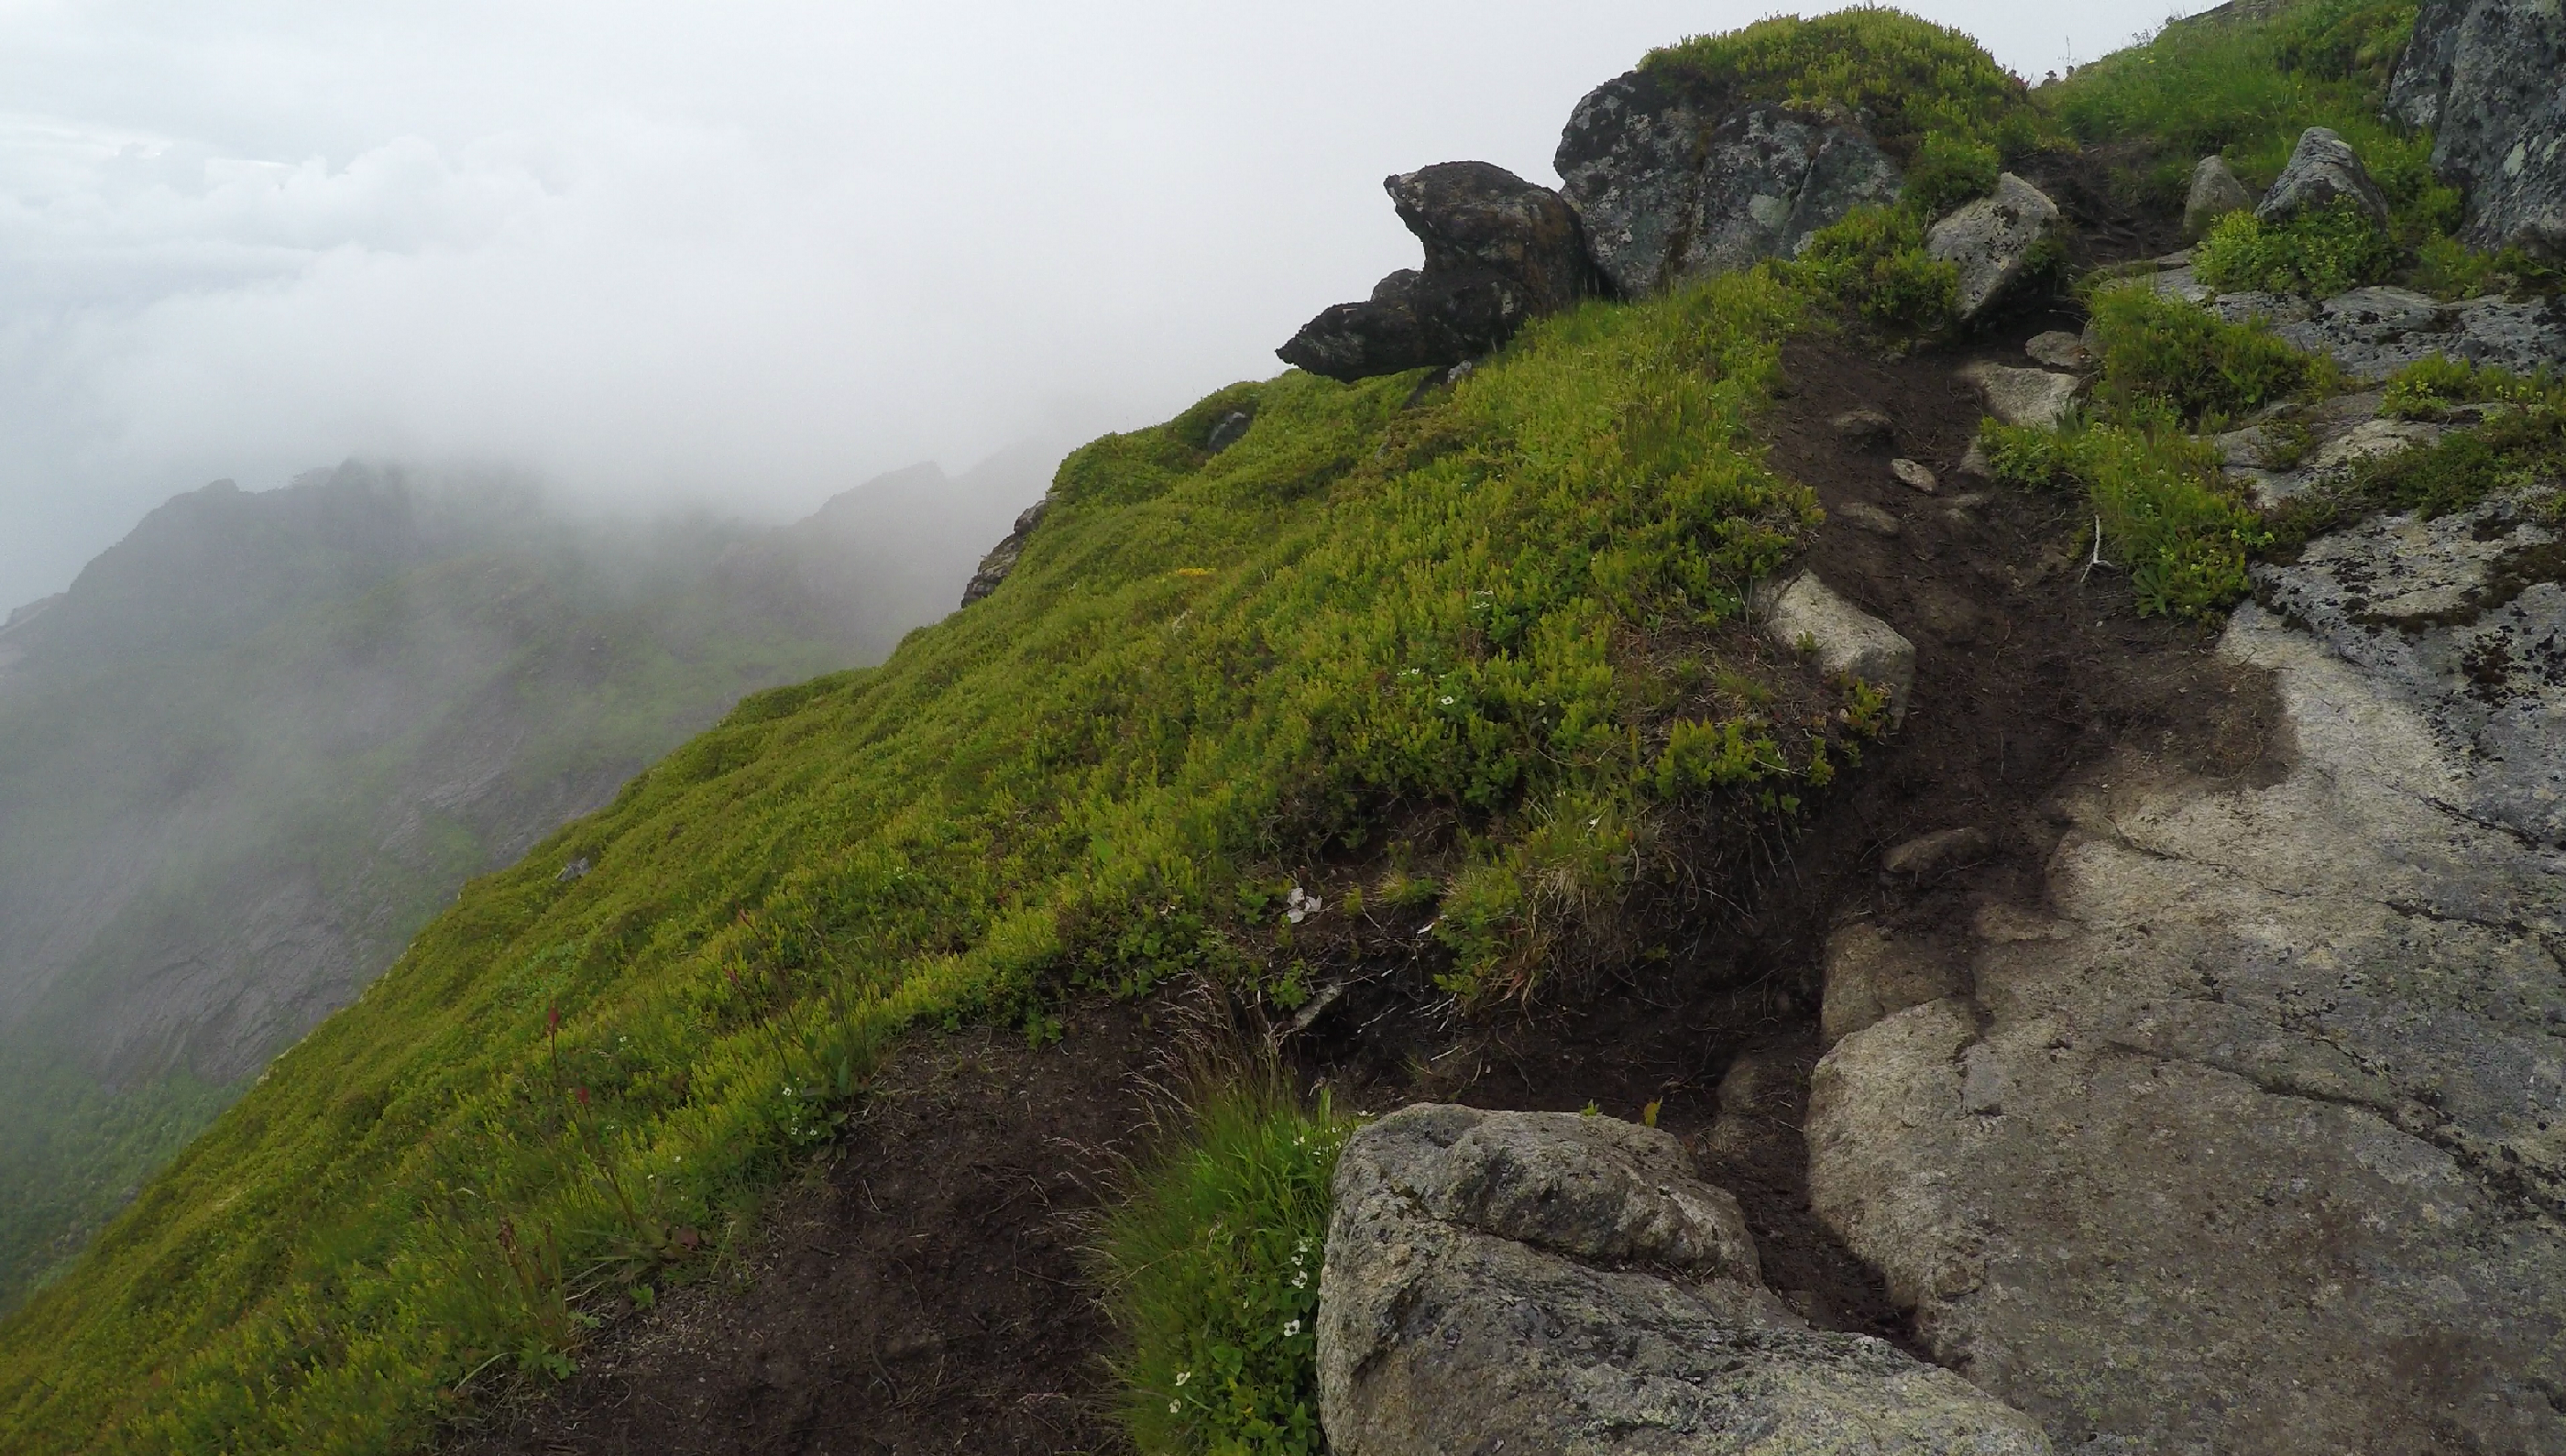
Hiking to Reinebringen in Lofoten in July, 2017

Hiking to the top of the mountain Reinebringen in Lofoten is something many tourists seek to do, and I’ve even read about people whose only reason for visiting Norway is to do the hike. I hiked to the top earlier this months, and I thought I’d share some insight for anyone seeking up to date information.
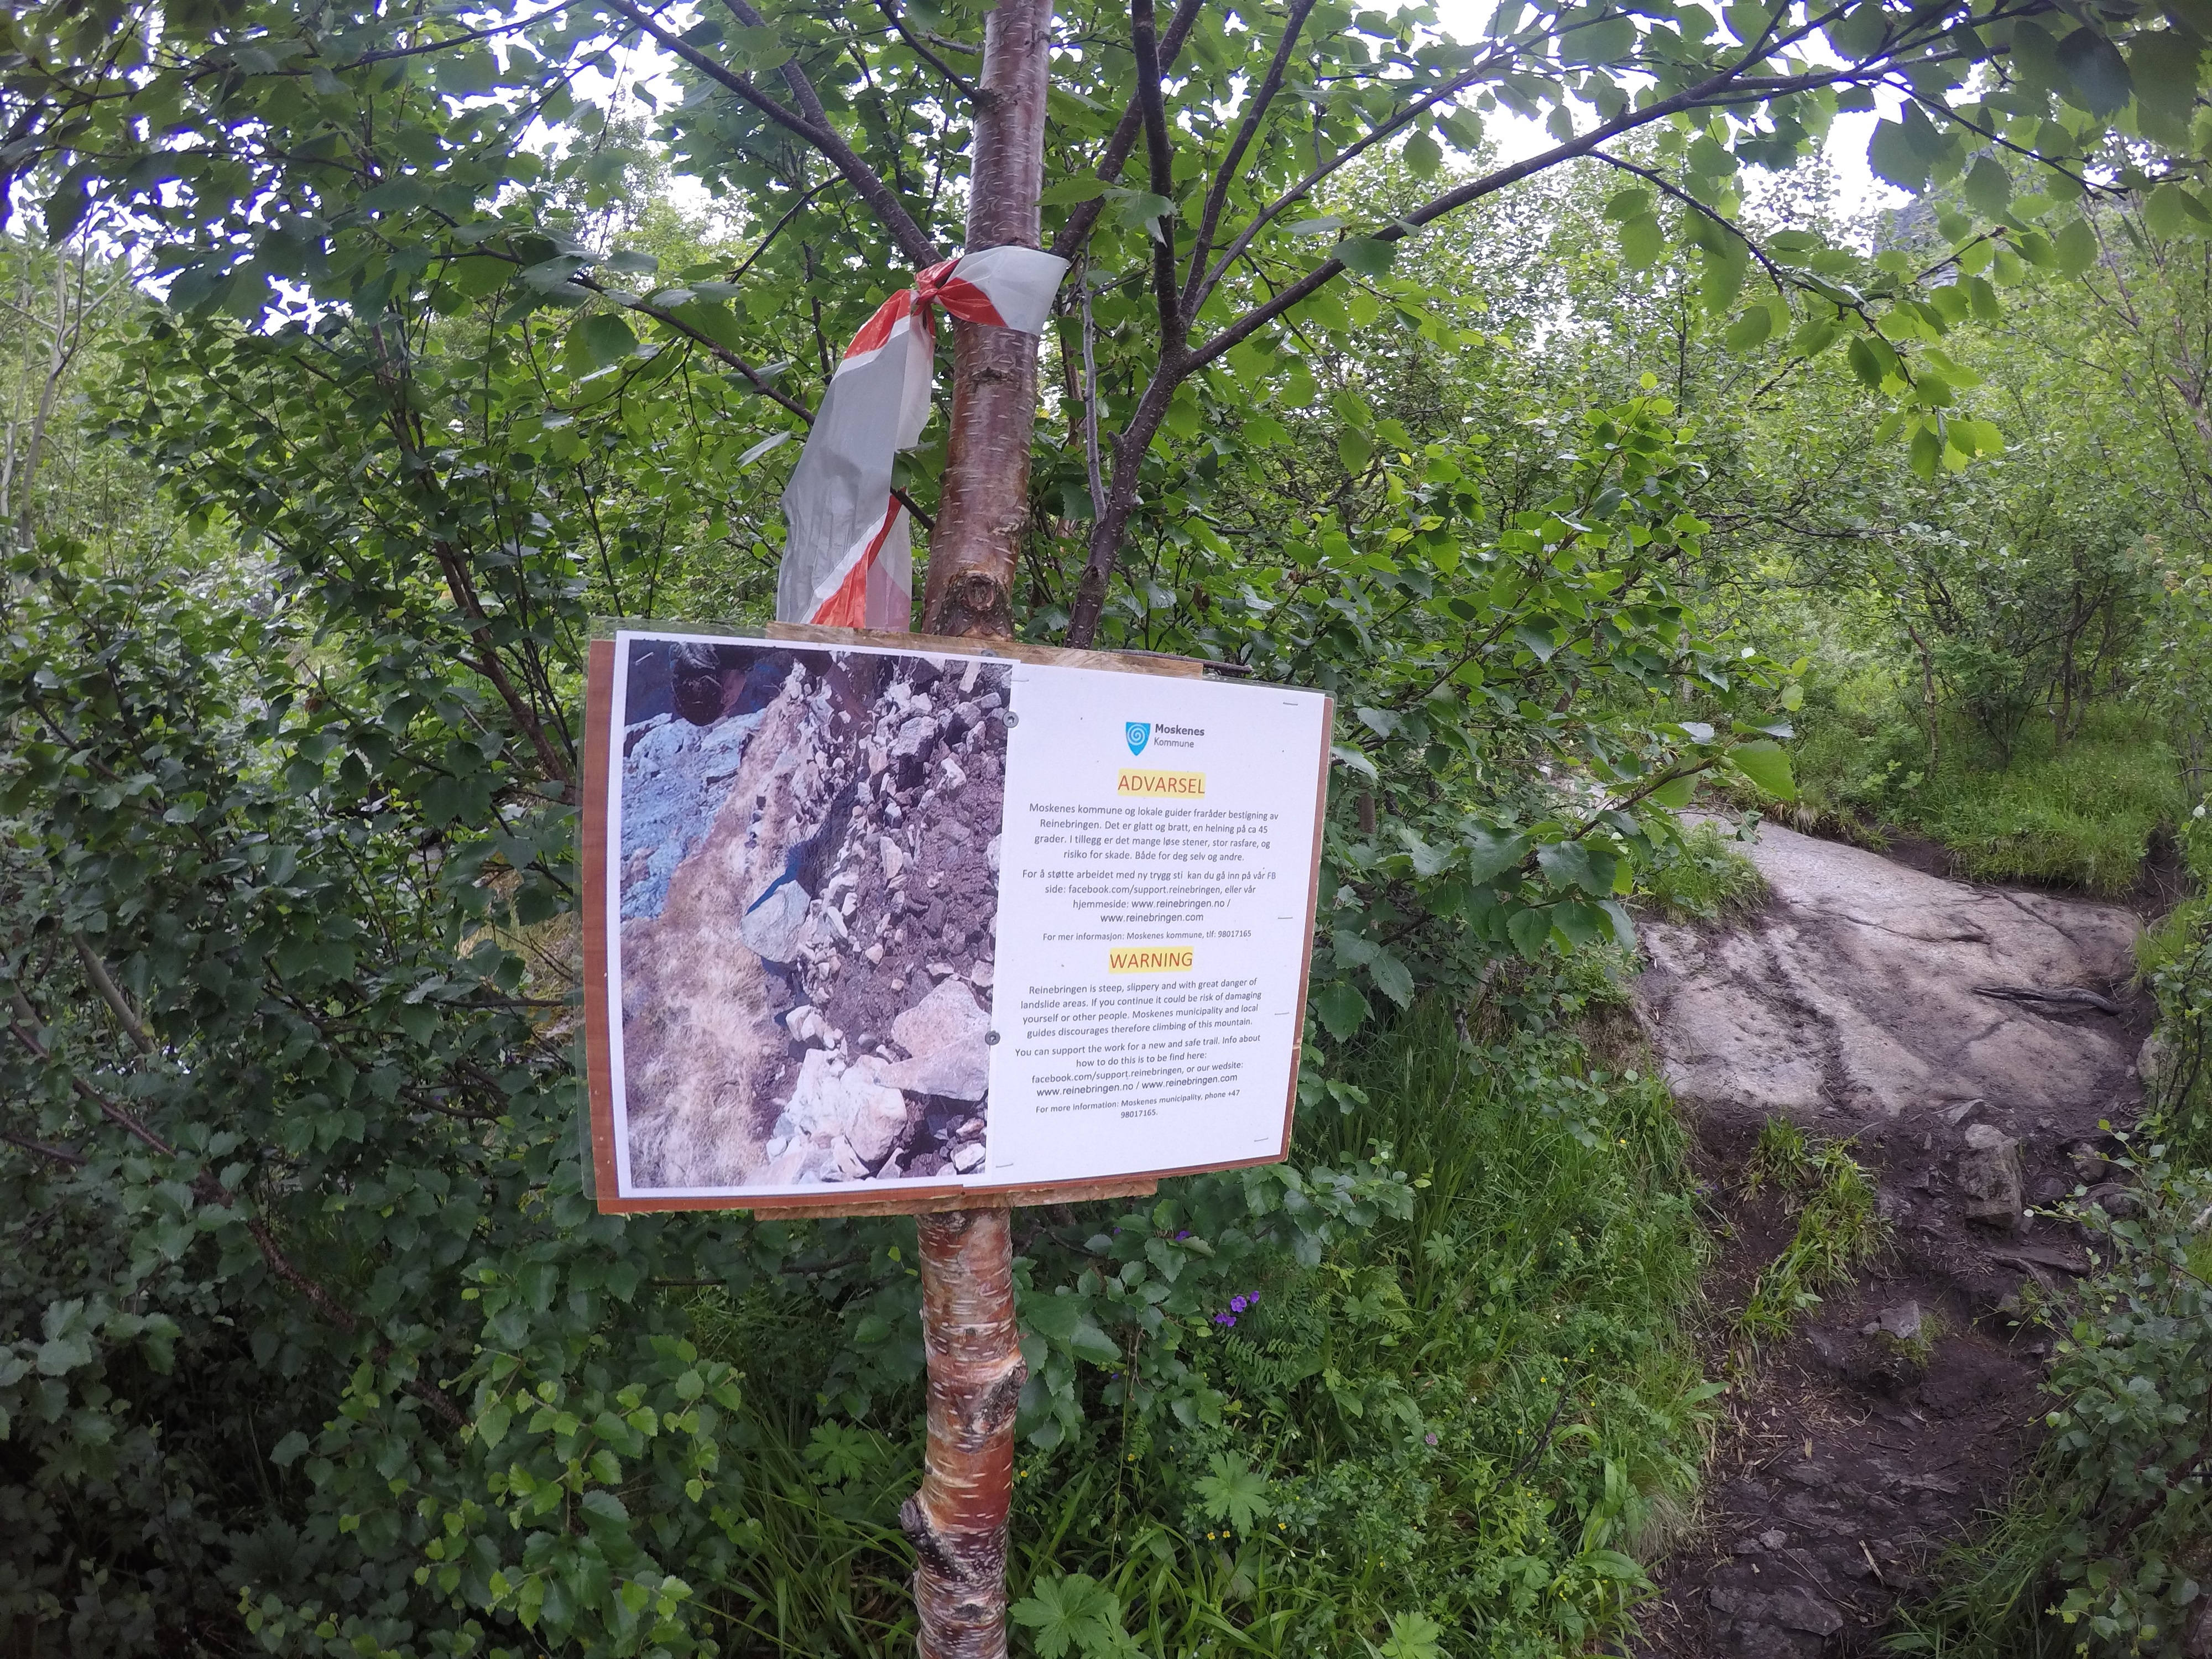
The hike is currently officially discouraged by the municipality due to the conditions of the trail, and tour guides currently do not offer tours. This was obvious by several signs placed by the start of the trail, and by what remained of some plastic cordon between a few trees at the start of the stone stairs. If you Google Reinebringen, you’ll find several warnings and discouragements. My travel companion and I did some searching and reading before going, and because of the warnings, we considered not doing the hike. After some thinking, we decided that we wanted to see for ourselves how bad the trail was, and that we would turn back if we felt unsafe during the ascend.
I will neither encourage or discourage people from going there. We did not feel unsafe, but the official discouragements are there for a reason. This is not a hike for anyone not used to hiking steep ascends and descends. This is not a hike for anyone in a bad shape. You need good hiking shoes, preferably high ankle boots with good support. The weather on the top of the mountain can be chilly and windy even if it’s fine down at the ground, so bring a windproof jacket and some extra clothes. You should of course bring water, and if carrying a backpack, pack lightly. We met several groups who obviously did not know what the trip entailed, carrying large backpacks and being in a bad shape physically and mentally. This is not a good idea.The dangers about hiking to Reinebringen are primarily two things: Wet, slippery mud and loose, rolling stones. We went after a slight drizzle, and the mud was somewhat slippery. I would not go after heavy rain. The danger of loose stones are not just about stepping on them and falling, but more dangerously if other people step on them and the stones start rolling. If you’re unlucky, you may get one of those in your face at high speed. For this reason, I would not do the hike if seeing many people ascending in front of me. If you step on a stone and it starts rolling, yell “ROCK!” so any other people can prepare for what’s coming. Be careful, and turn back if you feel unsafe or unprepared.

Changing aspect ratio from 4:3 to 16:9 with Premiere Pro
YouTube uses a 16:9 aspect ratio for their player, which means that a video with an aspect ratio of 4:3, 3:2 or any other than 16:9 will be displayed with black boxes on top and bottom or on the left and right side (see examples below). Since the GoPro and many other cameras take pictures that are in a 4:3 ratio, this means that time lapse videos compiled from still images will appear with black boxes on the left and right side when uploaded to YouTube.
The most straight forward way of converting from 4:3 to 16:9 with Premiere Pro involves cropping the images, which means that you will lose parts of the images. This may or may not be a problem, but there is no doubt that 16:9 looks better on YouTube. I learned this trick from a YouTube tutorial.

Changing from 4:3 to 16:9:
- Add the video to the project.
- Add a new sequence with File -> New -> Sequence…
- Select a suitable preset.
- If you are uploading a 30 fps 1080p video, you could select e.g. AVCHD -> 1080p -> AVCHD 1080p30.
- If you are uploading a 4k video, you could select e.g. Digital SLR (anything else would work too), then go to Settings, then select Custom, then edit Frame size to 3840 × 2160 and click OK.
- Drag your video to your new sequence timeline, and click Keep existing settings when asked This clip does not match the sequence’s settings. Change sequence to match the clip’s settings?
- The video will now appear to be zoomed in a bit. We’ll fix this by rescaling and repositioning it according to the 16:9 aspect ratio.
- Select the video in the timeline.
- Go to Effect Controls.
- Experiment with the Scale and Position values in order to get a proper fit.
- The video now has a 16:9 aspect ratio, and is ready for exporting.
- When exporting to use on YouTube, you can use the format H.264 and e.g. preset YouTube 1080p HD or YouTube 2160p 4K.
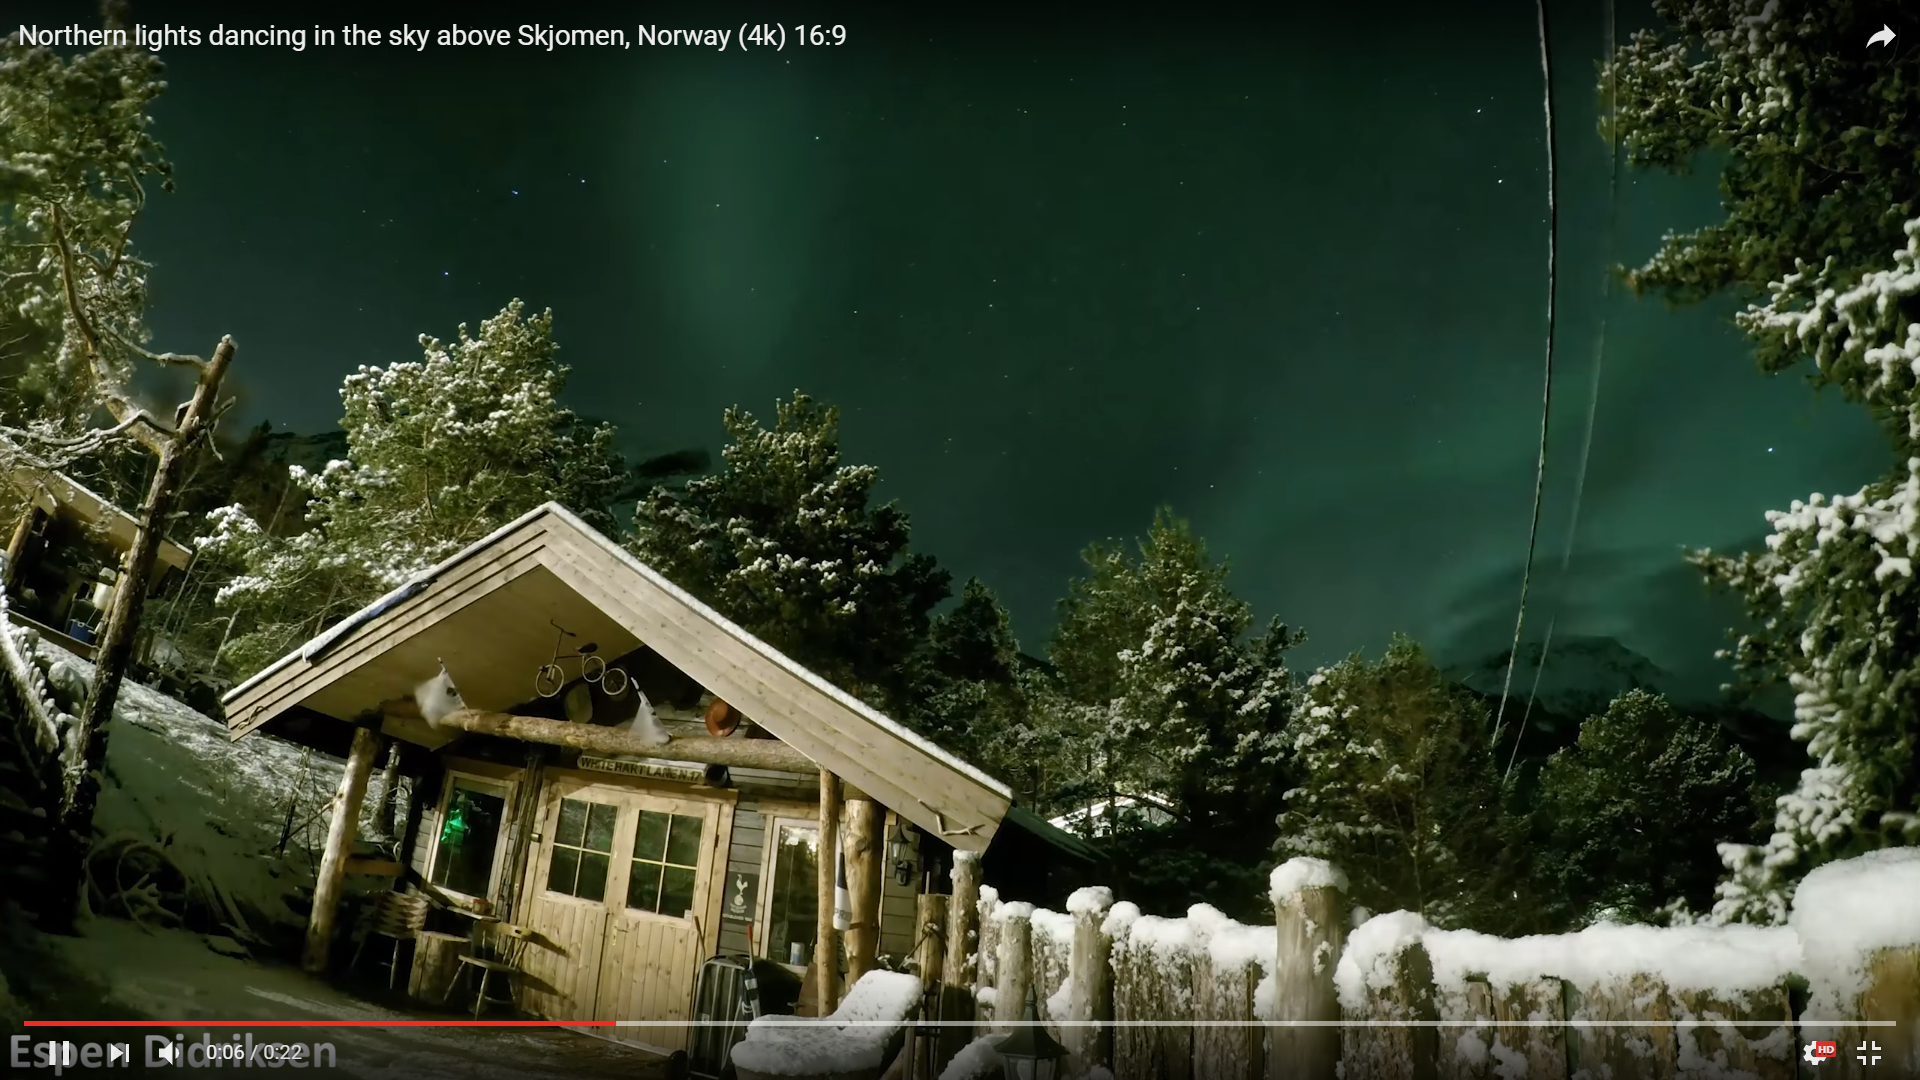
Northern lights photo on the front of promotional brochure
 Narvik municipality (Narvik kommune) contacted me, asking for permission to use a northern lights photo I took. They used it on the front cover of a promotional brochure they made in English, where they seek to draw people to the city.
They adjusted the colors according to the style and feel they wanted for the brochure, and did a good job.
The photo I selected was the best still image from a time lapse video I made in December 2016, in Skjomen, Narvik. It was actually taken with a GoPro Hero 4, which is surprisingly well suited to capture northern lights. The downside of using a GoPro is that the pictures are in a 4:3 aspect ratio unless you stretch or crop them. I would of course rather have used my Nikon for creating the time lapse, but I only had the GoPro available.
The GoPro was placed in a bench and held by the tripod from the 3-Way grip, which made it stable even though it was a bit windy that night. The shutter was set to 30 seconds, white balance to 3000K and ISO to 800. It was left for 2h 45min, taking about 330 pictures. Afterwards, I compiled it to a 22 second time lapse video.
How I solved the E204 and E101 errors on my Xbox One

A few weeks ago, I got a brand new Xbox One as a gift. I was very eager to play Fallout 4, but I was disappointed to see that after the mandatory initial update, the entire screen covered with an error message:
System Error.
Contact Xbox Customer Support
E204 10010B04 80070002
Continue reading “How I solved the E204 and E101 errors on my Xbox One”
Mapping all the Wi-Fi networks in a small town in Norway
 In February and March of 2012, a fellow student and I performed some Wi-Fi data gathering as part of our Bachelor’s thesis. This activity, known as wardriving, consisted of driving in as many streets as possible in the city of Narvik, Norway, equipped with a laptop (running inSSIDer), a 25 dBi omni-directional antenna and a GPS receiver.
The purpose of the experiment was to determine the current distribution of security algorithms, in particular to see how many still use WEP almost ten years after its deprecation. Continue reading “Mapping all the Wi-Fi networks in a small town in Norway”
Geocaching with the Suunto Ambit GPS watch
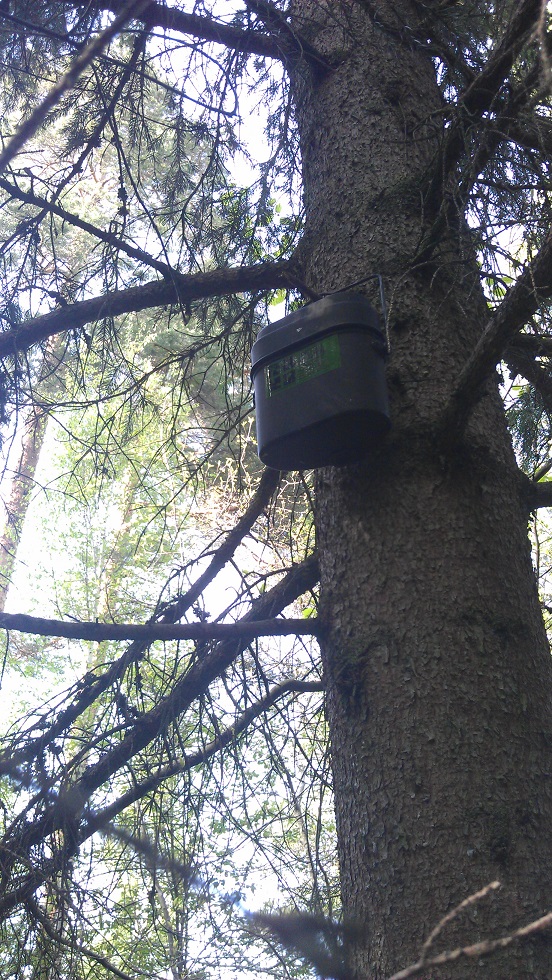
Geocaching is a great sport that consists of locating physical containers (called a cache) by using a GPS device. In short, you find the GPS coordinates for nearby caches on geocaching.com, and enter them to into the GPS device. After locating the cache, you sign its physical logbook and use geocaching.com to log that you’ve found it. Geocaching is a great way of discovering new places, since the caches are usually placed on or near locations with something interesting to see, such as trails, places with great views, historical buildings, etc. There are currently 2,263,860 caches out there!
I usually use the Geocaching app on my smartphone, but having GPS enabled and the screen brightness on full really consumes battery. When I was thinking about buying the Suunto Ambit GPS watch for exercise and exploring, I was curious about how it geocaching friendly it was. Continue reading “Geocaching with the Suunto Ambit GPS watch”
Attacks on electronic car key systems
Last year ago I wrote a term paper as part of the “Applied information security” course at Gjøvik University College where I’m a master’s student. Researching the topic was very interesting, and I thought I’d share my work with the public.
Continue reading “Attacks on electronic car key systems”
Many Norwegian webshops don't care about their users' passwords
One of the most basic things you learn as you begin developing software that handle user accounts and passwords, is the importance of storing their passwords securely. Storing passwords securely is done by storing the result of a one-way cryptographic function instead of storing the password in plain text in the user database. Which cryptographic function you as a developer should use is always an ongoing discussion that changes often.
Continue reading “Many Norwegian webshops don't care about their users' passwords”